
Greetings, fellow developers! I hope you're all doing well. Today, I'm thrilled to delve into the realm of multi-tenant architecture and share my insights and experiences from constructing a backend application that fully embraces this approach.
Let's paint a vivid picture: imagine your software as a colossal apartment complex. In this virtual edifice, every user or organisation functions as a tenant, residing in one of the apartments. They peacefully coexist within the same architectural structure, which represents your software's backend. However, they each maintain their unique, private spaces — think of them as their data sanctuaries housed in separate databases. The primary objective? Safeguarding their data, ensuring its security, and enforcing strict boundaries to prevent any unauthorised peeping into their digital "apartments." It's akin to orchestrating the management of a vast, interconnected digital apartment complex!
In this blog, we'll demystify the complexities of multi-tenant architecture, making it accessible even to beginners. So, let's embark on this enlightening journey together!
Before we commence, I'd like to extend a special shout-out to this exceptional Medium blog that served as a wellspring of inspiration for my exploration.
The Challenge at Hand
- Each tenant must have their dedicated database.
- Admin should possess the capability to deactivate specific tenants.
- Storing user passwords in the main database is an absolute no-go.
Of course, there were other requirements as well, but we'll keep our focus squarely on these for the scope of this blog.
High Level Overview
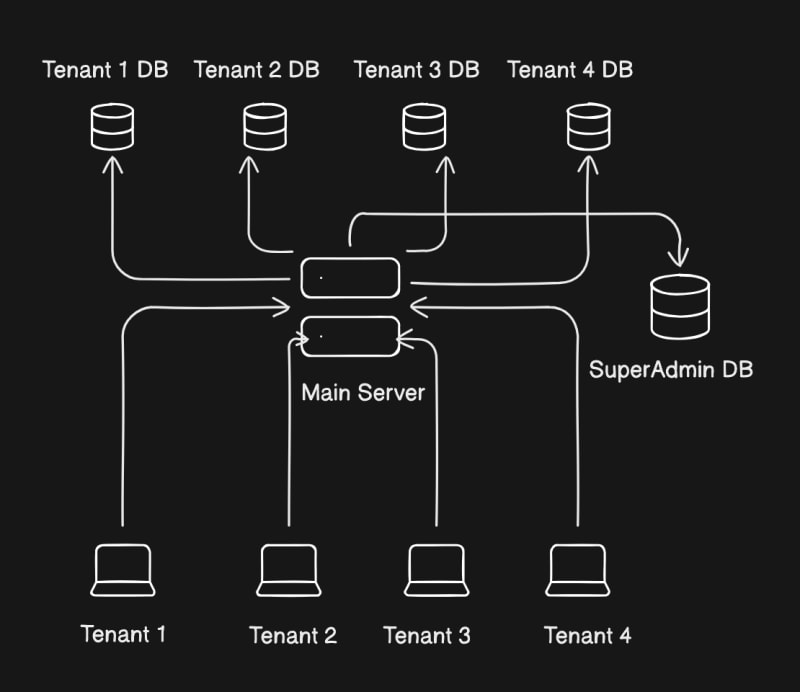
As you can see, we have four clients, each with their own database. They all interact with the same backend, which performs its magic and connects them with their respective databases. To manage all of this, we need a super admin database that keeps track of all users and can store additional details you might need, such as pricing information or the modules to which a tenant has access.
Now that we've set the stage, let's dive into the exciting part – the code!
For this example, I'll be using Node.js, Express, and MongoDB for the database. However, you can adapt this approach to suit your tech stack. It's surprisingly straightforward once you grasp the concept.
P.S - After I completed the blog I noticed that the blog got too technical and some people might not like it and would only visit to get the gist or an idea of how it works. So I have added a section at last which gives the application overview. You can use that to just get the idea.
Code
Initialisation
To kickstart our project, let's create a directory for it. I'll name it "multi-tenant," but feel free to choose a name that suits your project.
mkdir multi-tenant
After this we initialise the npm project
npm init -y
Now, let's install the necessary third-party packages.
npm i cookie-parser express jsonwebtoken lru-cache mongoose
Feel free to initialize a Git repository as well, but for this demo, I won't cover that step.
Additionally, I'll be using ES6 modules instead of CommonJS. Please bear with me, as I work on both frontend and backend, and I prefer to keep things consistent when possible. To enable ES6 modules, you can add "type": "module" in your package.json or use the .mjs file extension.
Directory Structure
Before we dive into the code, let me explain how I organize my backend projects into different directories to keep the codebase organized. This structure is what we'll follow for this blog:
- Controllers - Controllers: This is where API entry points reside, mainly for request validation.
- Services - Here, the core business logic of the backend lives. It includes data manipulation, API calls, and database query building.
- Repositories - These interact with the database. Services call repositories after constructing queries, and repositories handle database interactions and return results.
- Utils - In this directory, I store helper functions that don't interact with clients but assist the backend, such as password hashing, JWT management, etc.
- Middleware - This directory contains code executed before reaching our APIs. It's where we can write logic to determine the database to use and validate the tenant. This separation helps keep our main backend logic separate from connection logic.
- Server - This holds configuration files for our server, such as Express setup and potentially CORS configuration (not used in this demo but recommended).
- Routes - Code in this directory defines the routes and endpoints that clients can access.
- Schema - Here, we store the database schema.
.
├── controllers
├── middleware
├── repositories
├── routes
├── schema
├── server
├── services
└── utils
Here is how our directory will look like.
Now, keep in mind that I won't go super deep into how to separate admin and tenant logic in this demo, but you can achieve it by creating separate admin and tenant directories within all the the directories to organize the logic accordingly. For this demo, we're focusing on setting up the architecture.
Creating Our Server
We'll start by creating the entry point for our server, which is the index.js file. It will initialize the Express app. The actual initialization of our Express app will be handled in the server directory, as index.js doesn't need to worry about the Express setup; its role is to require all the initialization functions, which connect to the DB, initialize middleware, set up Redis, etc.
Here's the server/express.config.js file:
import express from "express";

const ExpressConfig = () => {
  const app = express();
  app.use(express.json());
  app.set("trust proxy", true);
  return app;
};
export default ExpressConfig;
Now, let's use this configuration in our index.js, which will bind our server to a port:
import ExpressConfig from "./server/express.config.js";

const app = ExpressConfig();


const PORT = 5000;

app.listen(PORT, async () => {
  console.log(`Multi Tenant Backend running on port ${PORT}`);
});
It's important to note that for this demo, I haven't used environment variables to define the port. However, in your production project, it's highly recommended to use environment variables. This allows you to set the PORT variable and other configuration options dynamically based on your environment, making your application more flexible and secure.
Initial Middleware setup
Now, let's dive into setting up the initial middleware for our backend. Currently, we'll implement the essential middleware, and we'll revisit this section when we need to code the logic for validating and determining the database connection.
We start by creating the middleware/index.js file
import cors from "cors";
import cookieParser from "cookie-parser";

export default function (app: Application) {

  app.use(cookieParser());

}
For this demo, we've kept it simple. We're using cookie-parser to handle tokens as HTTP-only cookies. In production code, you can expand on this file to include additional middleware such as defining CORS policies, rate limiting, setting up request context (a file used to log the request-response cycle), and more. Feel free to customize it according to your project's specific requirements and security considerations.
Database schema setup
Now, let's define the schema for our data. In this demo, I'll keep it simple, covering the basic elements, but please feel free to modify it to suit your specific requirements. It's worth noting that I'm not registering my collections with mongoose.model here. I'll register them when I start working on the database connection setup. The reason behind this is to avoid registering super admin schemas for tenants and vice versa. We want to keep these schemas separate.
Let's begin with the super admin collections.
Tenant Collection
The first collection I want to build is the tenant collection. In this collection, you can store metadata related to tenants, such as the modules they've purchased, user limits, and whether they are enabled or disabled. For simplicity, I'll only store the name and database URI. Here's the code for schema/tenant.js:
import {  Schema } from "mongoose";

const tenantSchema = new Schema(
  {
    dbUri: { type: String, required: true },
    name: { type: String, unique: true, required: true },
  }
);

export default tenantSchema;
Tenant User Collection
The second super admin collection stores all the users our application has, regardless of their tenant. Again, for simplicity, I'll keep it basic. You can extend it to include fields like user roles or whether they are tenant administrators. Here's the code for schema/tenantUser.js:
import { Schema,Types } from "mongoose";

const tenantUserSchema = new Schema(
 {
   email: String,
   tenantId:{
       type: Types.ObjectId,
       ref: "tenants",
    }
  }
);
export default tenantUserSchema;
Now the tenants Database will have -
Users Collection
The third collection is a tenant collection. This will store data related to the users of that specific tenant. I've kept it basic for the demo, but you can add relevant fields to your schema as needed. Here's the code for schema/users.js:
import { Schema } from "mongoose";


const usersSchema= new Schema(
  {
    email: { type: String, unique: true, required: true },
    password: { type: String },
  }
);
export default usersSchema;
With these database schema definitions in place, you now have a general idea of the project structure and how the data is organized. Feel free to adapt and extend these schemas to match your project's specific requirements.
Repositories
In this section, we'll define simple functions that take a query and perform database operations using it. Note that the first parameter for these functions will always be a database connection object. Since we're dealing with multiple database connections in a multi-tenant setup, we need to provide the appropriate database connection to the repository so it can perform operations on the correct database.
Let's start with the repositories/tenant.js file:
import mongoose from "mongoose";

const mainSchemaName = "tenants";

const getTenantsRepo = async (
  adminDbConnection,
  findQuery = {},
  selectQuery = {}
) => {
  const data = await adminDbConnection
    .model(mainSchemaName)
    .find(findQuery)
    .select(selectQuery)
    .lean();
  return data;
};

const getATenantRepo = async (
  adminDbConnection,
  findQuery = {},
  selectQuery = {}
) => {
  const data = await adminDbConnection
    .model(mainSchemaName)
    .findOne(findQuery)
    .select(selectQuery)
    .lean();
  return data;
};

// This function is part of a service
// that involves many database calls,
// so we'll use transactions here.
const addATenantRepo = async (
  adminDbConnection,
  tenantData,
  session = null
) => {
  const sessionOption = {};
  if (session) sessionOption.session = session;
  const data = await adminDbConnection
    .model(mainSchemaName)
    .create([tenantData], sessionOption);

  return data[0];
};

const updateATenant = async (
  adminDbConnection,
  findQuery = {},
  updateQuery = {},
) => {

  const data = await adminDbConnection
    .model(mainSchemaName)
    .updateOne(findQuery, updateQuery);
  return data;
};

export { getTenantsRepo, getATenantRepo, addATenantRepo, updateATenant };
Now, let's move on to the repositories/tenantUser.js file:
const mainSchemaName = "tenantusers";

// This function is part of a service
// with transactions.
const addATenantUserRepo = async (
  dbConn,
  userData,
  session = null
) => {
  const sessionOption = {};
  if (session) {
    sessionOption.session = session;
  }
  const data = await dbConn
    .model(mainSchemaName)
    .create([userData], sessionOption);
  return data[0];
};

const getATenantUserRepo = async (
  dbConn,
  findQuery,
  selectQuery = {}
) => {
  const data = await dbConn
    .model(mainSchemaName)
    .findOne(findQuery)
    .select(selectQuery)
    .lean();

  return data;
};

const updateATenantUserRepo = async (
  dbConn,
  findQuery,
  updateQuery
) => {
  const data = await dbConn
    .model(mainSchemaName)
    .updateOne(findQuery, updateQuery);
  return data;
};

export { addATenantUserRepo, getATenantUserRepo, updateATenantUserRepo };
Lastly, we have the repositories/users.js file:
const mainSchemaName = "users"

// This function is part of the service
// with transactions.
const addAUserRepo = async (
  dbConn,
  userData,
  session = null
) => {
  const sessionOption = {};
  if (session) sessionOption.session = session;
  const data = await dbConn
    .model(mainSchemaName)
    .create([userData], sessionOption);
  return data[0];
};

const getAUserRepo = async (
  dbConn,
  findQuery = {},
  selectQuery = {}
) => {
  const data = await dbConn
    .model(mainSchemaName)
    .findOne(findQuery)
    .select(selectQuery)
    .lean();
  return data;
};

const updateUserRepo = async (
  dbConn,
  findQuery,
  updateQuery
) => {
  const data = await dbConn
    .model(mainSchemaName)
    .updateOne(findQuery, updateQuery);
  return data;
};

const getUsersRepo = async (
  dbConn,
  findQuery = {},
  selectQuery = {}
) => {
  const data = await dbConn
    .model(mainSchemaName)
    .find(findQuery)
    .select(selectQuery)
    .lean();

  return data;
};


export {
  addAUserRepo,
  getAUserRepo,
  updateUserRepo,
  getUsersRepo,
};
Main connection setup
In this section, we will focus on setting up the logic for managing all the database connections and utilizing an optimal database structure, such as an LRU (Least Recently Used) cache, to efficiently manage these connections. While we're defining both initialization functions for the admin and tenant connections here, you should consider separating the logic for better organization. Additionally, note that we register the models here on the database object.
Lets start with the utils/initDBConnection.js file
import mongoose, { Connection } from "mongoose";
import TenantSchema from "../schema/tenant.js";
import TenantUserSchema from "../schema/tenantUser.js";
import UserSchema from "../schema/user.js";

const clientOption = {
  socketTimeoutMS: 30000,
  useNewUrlParser: true,
  useUnifiedTopology: true,
};

// Log MongoDB queries
mongoose.set("debug", true);

const initAdminDbConnection = async (
  DB_URL
) => {
  try {
    const db = mongoose.createConnection(DB_URL, clientOption);

    db.on("error", (err) =>
      console.log("Admin db error: ", err)
    );

    db.once("open", () => {
      console.log("Admin client MongoDB Connection ok!");
    });

    await db.model("tenants", TenantSchema);
    await db.model(
      "tenantusers",
      TenantUserSchema
    );

    return db;
  } catch (error) {
      return error;
  }
};

const initTenantDBConnection = async (
  DB_URL,
  dbName
) => {
  try {
    const db = mongoose.createConnection(DB_URL, clientOption);

    db.on("error", (err) =>
      console.log(`Tenant ${dbName} db error: `, err)
    );

    db.once("open", () => {
      console.log(
        `Tenant connection for ${dbName} MongoDB Connection ok!`
      );
    });

    await db.model("users", UserSchema);

    return db;
  } catch (error) {
    return error;
  }
};
export { initAdminDbConnection, initTenantDBConnection }
Now, let's define the code for the LRU cache manager in the utils/lruCacheManager.js file:
import { LRUCache } from "lru-cache";
import { Connection } from "mongoose";

const cacheOptions = {
  max: 5000,
  maxAge: 1000 * 60 * 60,
};

const connectionCache = new LRUCache(cacheOptions);

const setCacheConnection = (tenantId, dbConn): void => {
  console.log("Setting connection cache for ", tenantId);
  connectionCache.set(tenantId, dbConn);
};

const getCacheConnection = (tenantId) => {
  return connectionCache.get(tenantId);
};

const getCacheValuesArr = () => {
  return connectionCache.values();
};

export { setCacheConnection, getCacheConnection, getCacheValuesArr };
Now, let's code the file that is the heart of the application, the connection manager file! This file contains the logic for initializing the database and managing the collections so that our application can use them. Here is the code for utils/connectionManager.js:
import mongoose from "mongoose";

import { initAdminDbConnection, initTenantDBConnection } from "./initDBConnection.js";
import {
  getATenantRepo,
  getTenantsRepo,
} from "../repositories/tenant.js";
import {
  getCacheConnection,
  getCacheValuesArr,
  setCacheConnection,
} from "./lruCacheManager.js";

let adminDbConnection;

// This function will be called at the start
// of our server. Its purpose is to initialize the admin database
// and the database connections for all of the tenants.
export const connectAllDb = async () => {
  const ADMIN_DB_URI = `your admin db uri`;

  adminDbConnection = await initAdminDbConnection(ADMIN_DB_URI);

  const allTenants = await getTenantsRepo(
    adminDbConnection,
    { name: 1, dbUri: 1, _id: 1 }
  );

  for (const tenant of allTenants) {
    const tenantConnection = await initTenantDBConnection(
      tenant.dbUri,
      tenant.name
    );

    setCacheConnection(tenant._id.toString(), tenantConnection);
  }
};

export const getConnectionForTenant = async (
  tenantId
) => {
  console.log(`Getting connection from cache for ${tenantId}`);
  let connection = getCacheConnection(tenantId);
  if (!connection) {
    console.log(`Connection cache miss for ${tenantId}`);

    const tenantData = await getATenantRepo(
        adminDbConnection,
        { _id: tenantId },
        { dbUri: 1, name: 1 }
      )

    if (tenantData) {
      connection = await initTenantDBConnection(
        tenantData.dbUri,
        tenantData.name
      );
      if (!connection) return null;

      console.log("Connection cache added for ", tenantData.name);

    } else {
      console.log(
        "No connection data for tenant with ID",
        tenantId
      );
      return null;
    }
  }

  return connection;
};

export const getAdminConnection = () => {
  console.log("Getting adminDbConnection");
  return adminDbConnection;
};

const gracefulShutdown = async () => {
  console.log("Closing all database connections...");

  const connectionArr = getCacheValuesArr();

  // Close all tenant database connections from the cache
  for (const connection of connectionArr) {
      await connection.close();
      console.log("Tenant database connection closed.");
  }

  // Close the admin database connection if it exists
  if (adminDbConnection) {
    await adminDbConnection.close();
    console.log("Admin database connection closed.");
  }

  console.log("All database connections closed. Yay!");
};

let isShutdownInProgress = false;

// Listen for termination signals
["SIGINT", "SIGTERM", "SIGQUIT", "SIGUSR2"].forEach((signal) => {
  process.on(signal, async () => {
    if (!isShutdownInProgress) {
      console.log(`Received ${signal}, gracefully shutting down...`);
      isShutdownInProgress = true;
      await gracefulShutdown();
      process.exit(0);
    }
  });
});
Hash!!! that concludes the major part of our application. I hope you understand the code its not much just some functions to manage the db connections but it is still the heart of our application.
Lets define some util functions that will help us later in our services. We can name this file as the misc.js which contains miscellaneous functions so here is the code for utils/misc.js
import jwt from "jsonwebtoken";

const signJWT = (data) => {

  return jwt.sign(data, "random secret");

};

const verifyJWT = (
  payload
) => {
    return jwt.verify(payload, "random secret");
};

// define in your env file
const saltRounds = 10

const generateHash = async (input) => {
  try {
    const hash = await bcrypt.hash(input, Number(saltRounds));
    return hash;
  } catch (error) {
    console.error("Error generating hash:", error);
    throw error;
  }
};

const comparePassword = async (plainPassword, hash) => {
  try {
    const match = await bcrypt.compare(plainPassword, hash);
    return match;
  } catch (error) {
    console.error("Error comparing password:", error);
    throw error;
  }
};

export {
  signJWT,
  verifyJWT,
  generateHash,
  comparePassword,
};
Services
In this section, we'll dive into the core business logic of our application.
So lets start with the most intense service file! The services/tenant.js file.
import mongoose from "mongoose";
import {
  addATenantRepo,
 } from "../repositories/tenant.js";
import { addATenantUserRepo } from "../repositories/tenantUser.js";
import { setCacheConnection } from "../utils/lruCacheManager.js";

import { addAUserRepo } from "../repositories/user.js";
import { initAdminDbConnection, initTenantDBConnection } from "../utils/initDBConnection.js";

const addATenantService = async (
  dbConn,
  tenantData
) => {
  const session = await dbConn.startSession();
  session.startTransaction();
  try {
    const data = await addATenantRepo(
      dbConn,
      { ...tenantData },
      session
    );

    let userData;
    if (data._id) {
      userData = await addATenantUserRepo(
        dbConn,
        {
          tenantId: data._id,
          email: tenantData.email,
        },
        session
      );

      const tenantDbConnection = await initTenantDBConnection(
        data.dbUri,
        data.name
      );

      await addAUserRepo(
        tenantDbConnection,
        {
          _id: userData._id,
          email: tenantData.email,
        },
        session
      );

      await session.commitTransaction();
      session.endSession();

      setCacheConnection(data._id.toString(), tenantDbConnection);
    }

    return {
      success: true,
      statusCode: 201,
      message: `Tenant added successfully`,
      responseObject: { tenantId: data._id, userId: userData?._id },
    };
  } catch (error) {
    await session.abortTransaction();
    session.endSession();
    throw error;
  }
};

export { addATenantService };
The addATenantService function handles the process of adding a new tenant to the system. It follows these steps:
- Adds tenant data to the super admin tenant collection.
- Adds user details to the super admin tenant users collection.
- Links the user to the tenant in the tenant users collection, maintaining consistency between the super admin and tenant databases.
Now, let's move on to the services/auth.js file, which contains authentication-related logic:
import { signJWT } from "../utils/misc.js";

const loginService = async (
  userData
) => {
  if (!userData || !userData|| !userData._id || !userData.tenantId)
    return {
      success: false,
      statusCode: 401,
      message: `No user with the given credentials`,
      responseObject: {
        incorrectField: "email",
      },
    };

  // Do some password matching

  const accessToken = signJWT(
    {
      userId: userData._id.toString(),
      tenantId: userData.tenantId.toString(),
    }
  );

  return {
    success: true,
    statusCode: 200,
    message: `Logged In Successfully`,
    responseObject: {
      accessToken,
      userId: userData._id.toString(),
      tenantId: userData.tenantId.toString(),
    },
  };
};
The loginService function handles user login and generates an access token, which is crucial for our application as it contains the userId and tenantId. This token will be used to verify requests and determine the appropriate database connection based on the tenantId. For this demo I didn't write the code to match the passwords but you should write your own logic based on your needs.
This concludes our Services section. Now lets move on to the Controllers and Route section.
Controllers & Routes
I've covered the Services section, and now let's dive into Controllers and Routes. In this section, I'll provide you with the necessary code for setting up controllers and routes. I won't delve into detailed explanations, as the code is straightforward. However, it's essential to organize your code effectively, so I'll provide a basic structure.
So here is our controllers/index.js file code
import { loginService } from "../services/auth.js"
import { addATenantService } from "../services/tenant.js"

export function loginController = async (req,res)=>{
  const serviceFnResponse = await loginService(req.body);

  res.status(serviceFnResponse.code).json({...serviceFnResponse});
}

export function addATenantController = async (req,res)=>{
  const serviceFnResponse = await addATenantService(req.body);

  res.status(serviceFnResponse.code).json({...serviceFnResponse});
}
In these controllers, you should add code to validate the request body, ensuring data integrity and security. Proper input validation is a crucial step in building a robust application.
Now, let's define your application's routes in the routes/index.js file:
import { Router } from "express"
import { loginController, addATenantController } from "../controllers/index.js"

const router = Router()

router.post("/add",addATenantController);
router.post("/login",loginController);

export default router;
This code creates an Express router and defines your application's routes. In a real-world scenario, you would likely have more routes, each mapped to specific controllers. For maintainability, consider organizing your routes into separate files, one per resource or feature.
By structuring your code this way, you maintain a clean and organized project, making it easier to add new features or extend existing ones in the future.
Middleware
Now, let's dive into the engine of our application – the middleware. This code will handle the heavy lifting, such as deciding the database connection and tenant for each request. We'll start with the middleware/databaseResolver.js file:
import { getConnectionForTenant } from "../utils/connectionManager.js";
import { verifyJWT } from "../utils/misc.js";

export const databaseResolver = async (req, _, next) => {
  const urlArr = req.url.split("/");

  // Skip database resolution for login route
  if (urlArr.includes("login")) return next();

  const token = req.headers.jwt;
  // Handle the logic for null checking and authorization
  const payloadData = verifyJWT(token);
  // Handle the expiry logic, etc.
  const dbConnection = getConnectionForTenant(payload.tenantId);

  // Here, we are directly populating the req object, but you can use
  // custom context managers in your application
  req.dbConnection = dbConnection;
  next();
};
We've defined the basic middleware logic that resolves the appropriate database connection based on the request's tenant information. The middleware also skips this process for the login route.
Next, let's configure the middleware to be used in our application. Create a new file called server/middleware.config.js:
import { databaseResolver } from "../middleware/databaseResolver.js"

export default function(app){
  app.use(databaseResolver);
}
You might be wondering why we use a separate file for middleware when the code is relatively short. However, in a production-level application, you'll likely have more complex middleware requirements, such as request sanitization, logging, and more. Having a separate middleware configuration file allows you to manage and organize these requirements efficiently.
Exmaple - santizing middleware for requests, Logging middleware, etc.
This file sets up your application's routes, and in a real-world scenario, you'd have multiple routes organized by resource or feature.
server/route.config.js
import router from "routes/index.js"

export default function(app){
  app.use('/api',router);
}
Now all you need to do is just require all the config in your index.js file
import ExpressConfig from "./server/express.config.js";
import MiddlewareConfig from "./server/middleware.config.js";
import RouteConfig from "./server/route.config.js";

const app = ExpressConfig();

MiddlewareConfig(app)
RouteConfig(app)

const PORT = 5000;

app.listen(PORT, async () => {
  console.log(`Multi Tenant Backend running on port ${PORT}`);
});
By structuring your code in this way, you maintain a clean and organized index.js file, making it easier to understand and extend your application as it grows.
And we're done! Congratulations on building the foundation for your own multi-tenant application. This powerful structure can be used as a base for creating complex Software as a Service (SaaS) applications. If you feel that the technical details have become a bit overwhelming, don't worry. Let's provide an overview using a diagram to visualize how the application works, giving us a refresher on all the moving parts in our application.
Application Overview

Client Request: When a user interacts with your platform, like logging in or accessing data, their request is sent to your server. This request comes with a special key called a JSON Web Token (JWT), like a secret passcode.
Middleware: The request first enters a checking point called Middleware. It's like a bouncer at a club. If the request is about logging in, it gets a quick pass. Otherwise, it moves on to the next step.
Database Resolver: Here comes the real magic. The Database Resolver looks at the JWT passcode and figures out which company (tenant) the user belongs to. It's like sorting mail to different mailboxes.
Database Connection: Once the Resolver knows which tenant it is, it opens the right door – the tenant's database. It's as if each tenant has their own room in a huge library, and only they can access their own books.
Controller: With the right room (database) open, the Controller takes over. It's like a librarian who helps you find the book you need. The Controller figures out what the user wants to do and fetches the information from the correct room (database).
Services: Inside the Controller, special helpers called Services do the hard work. They carry out tasks like checking if the user's password is correct or fetching data. These Services are like expert librarians who know where every book is kept.
Database Interaction: The Services talk to the database, ask it questions, and get answers. For example, they might ask, "Is this the right password?" or "Give me the data for this user." Each tenant's data is kept separate, so there's no mix-up.
Response Generation: Once the Services have all the answers, they create a response. It's like putting together a report with all the necessary information, and it includes a message like "Success!" or "Sorry, that's not right."
Controller Response: The Controller gets this report and prepares it for delivery. It's like putting it in an envelope with the user's address on it.
Client Response: Finally, the response is sent back to the user's device. It's like getting the report in the mail. The user sees the message and any data they requested, and they can continue using your platform.
So, in simple terms, your multi-tenant application is like a giant library with many rooms (databases). When a user asks for something, the application makes sure they go to the right room to get the right information. This way, each tenant's data stays private and secure, just like different books in different rooms of the library.
This system is great for running a cloud service where each tenant gets their own space while sharing the same platform.
If you have any further questions or need additional clarification on specific aspects of the application, please feel free to ask! Also if you have any suggestions for improvement please do let me know I would love to hear it.


Top comments (0)